In this post I will introduce the Open AI API collection and explain how to get started in Postman
In recent months, OpenAI and their services have went beyond development communities and hit the mainstream newsfeeds. With many user groups using ChatGPT and Dall-e generative AI services.
These user interfaces make the usage much more attainable for non developers, but there are many occasions we may want to build our own interfaces built on the OpenAI services. We can do this via their APIs.
Checkout the available APIs here on their documentation page: https://platform.openai.com/docs/api-reference
Now, lets get started.
Getting access to OpenAI APIs
- First, sign up for an account here: https://platform.openai.com/ .
- Depending on popularity of the service, you may be placed on a waitlist. However, when I signed up there was not a long wait.
- Go to the API keys page: https://platform.openai.com/account/api-keys and generate a key. This will be unique for your account and usage will contribute to your usage limits and charges, so keep it secret.
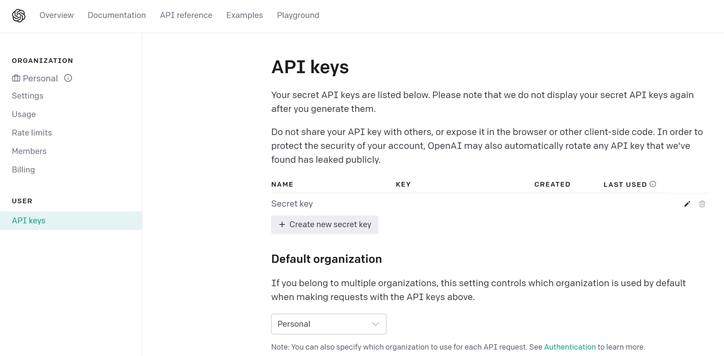
- When I sign up there was $5 free credit applied to account to allow playing with the API. You can check on this in the "Usage" menu item.
Using Postman
Per the documentation, you can test the APIs using curl commands. However, my preferred approach is to use Postman.
OpenAI have made a sample Postman collection available for their APIs, making it a great way to get started with their service.
- Sign up for a free Postman account.
- Visit the OpenAI Postman collection.
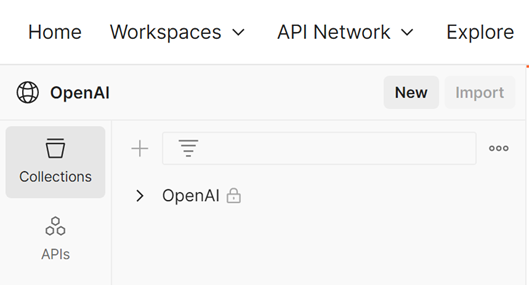
- To work with the APIs you will need to create your own copy. You have 2 options when right clicking on OpenAI item in menu (see screenshot): fork or export.
- Fork will create a copy on your public account.
- Export will allow you to import to a private collection on your account. If you take this option it will download a json file that you can then choose to upload to your own workspace.
Exploring the APIs
Now we have our own copy we can make changes to, lets explore the APIs! Expand the OpenAI collection in the menu to see the list of APIs available:

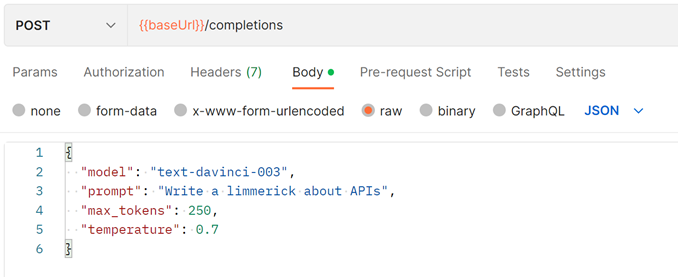
Each of these will have sample requests, for example the Completions API has the Body populated with sample json request (see screenshot). You can edit these to make your own API calls - we'll get to that soon.
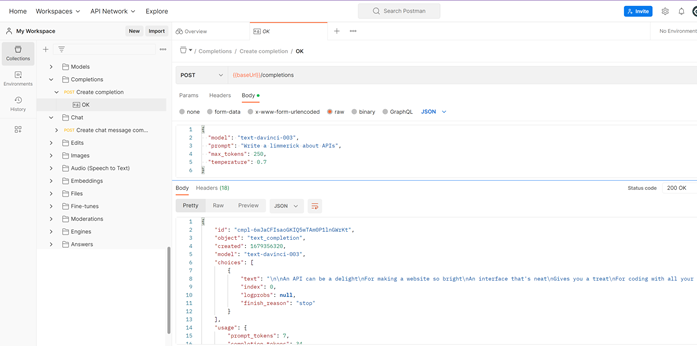
The example collection is also utilising the feature to save sample responses (one of my favourite Postman features when building my own APIs!). These are shown below the API calls in menu. In the screenshot below you can see not only the sample request we could see before but also the response received at the time this example was saved. This is not a live API call, but a saved point in time record of the API response. Unlike the API calls, you cannot edit these.
Calling the APIs
Let's go back to the root of the OpenAI collection and to the "Authorization" tab. You can take the API key you generated earlier and update the Token field. As the API calls are set to inherit the auth settings from the parent, this will automatically apply to all APIs in the collection.
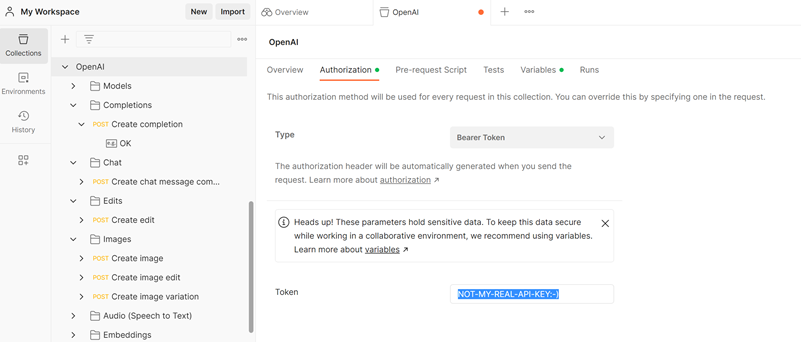
Make sure to save this (Ctrl+S) to apply.
If we go back to the Completions API and click "Send" you should now get an API response. I edited the request json slightly from the default example in the collection to "Write a poem about Postman for testing APIs".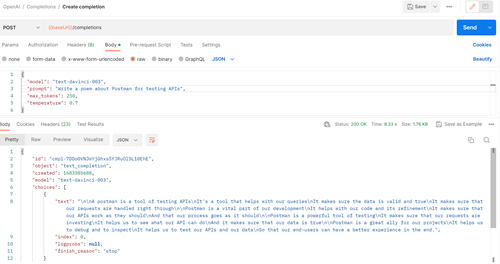
Not sure it will win any poetry awards any time soon! But a good example of how we can easily use the Postman collection to get started with OpenAI APIs.
I hope this post has been useful in calling your first OpenAI APIs! Now I'd recommend having a look through the other APIs available and exploring what they can do.